
Every clean we do includes a 7-point inspection, and across the 2,041 solar panel cleans we’ve logged since 2023, four things turn up again and again: lichen, birds’ nests, pollen, and the odd installer shortcut nobody mentioned at the time. None of that is a guess. It’s what’s actually in our job records.
Here’s what the numbers say about what’s really on New Zealand roofs, and what a proper inspection is checking for while the crew is already up there.
What turns up most: lichen
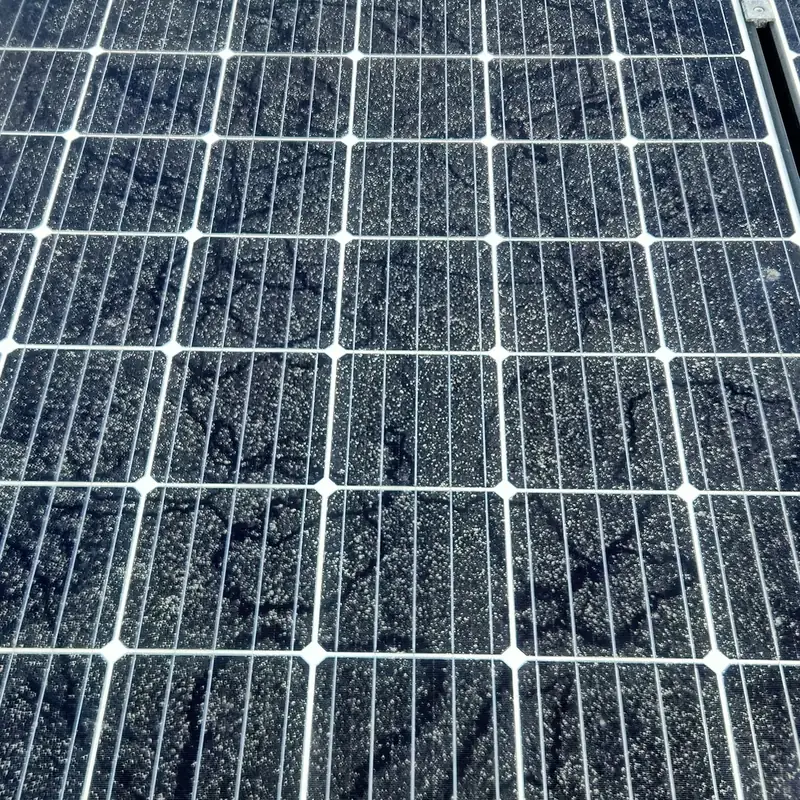
Lichen is still the single biggest thing we clean off. 461 of those 2,041 cleans, about 22%, needed lichen removed as well as the usual clean. It doesn’t grow the same everywhere. In Auckland, 105 of 343 cleans since 2023 (31%) needed lichen removed, one of the highest rates we see. Head to Tauranga, our busiest patch by job count, and it’s the opposite: only 84 of 574 cleans (15%) had lichen on them, about half the Auckland rate. Once it has taken hold it tends to return, which is why we wrote up why lichen comes back after a clean.
Left long enough, lichen stops being cosmetic. Edwin, one of the three brothers who run Eco Shine Solar, calls it a silent killer of solar systems: it grows over the cell like a coat of paint, creates a permanent hot spot under that patch, and if it’s left there for years it can eat into the seals, which is eventually how water gets in. None of that shows up on day one, which is why panel warranties ask for a yearly check, and why Edwin’s own rule of thumb is never to leave it longer than two.
A clean panel also produces more. We’ve seen output improve by up to 30% on some systems we’ve cleaned, lichen included.
What’s living under the panels
100 of the 2,041 cleans, about one in twenty, had a bird’s nest to clear out from under the array. Hamilton runs higher than that: 21 of 294 cleans there since 2023 found a nest. On top of that, 242 jobs over the same period were bird proofing on its own, mesh to keep birds from nesting in the first place. When the crew notes which bird it was, pigeons are mostly around Auckland and mynas through the rest of the upper North Island. Here is how to tell pigeons from mynas under your panels.
What’s landing on the glass
Pollen is mentioned in the crew’s notes on 103 jobs since 2023. Roof grime and moss come up often enough that about one in five of all our jobs, 485 since 2023, also included a roof treatment or a gutter clear while the crew was already up there. None of it damages the panels directly. It’s the kind of thing that builds up quietly between cleans and is genuinely hard to judge from the ground.
What installers leave behind
Some of what we find didn’t start with the weather (more in what we see on roofs after the installer leaves). Edwin has seen indoor conduit run across a roof to save a bit of money on install day. It looks fine at the time, then wilts and visibly erodes within a couple of New Zealand summers. He’s also seen cheap clamps, bolts and railing corrode faster than they should, especially anywhere near salt spray off the coast.
The other thing he watches for is what the industry calls a snail trail, a tiny tear in a solar cell that’s barely visible when it’s new and slowly gets worse as the panel heats and cools day after day. When we spot one, we photograph it, note it on the file, and compare it against the same panel on the next visit, so we can tell you whether it’s stable or getting worse well before it turns into a fire risk or a dead panel.
What the 7-point inspection checks
Every clean includes the same check of the whole system, not just the glass:
- Panels. Cracks, chips, snail trails and the marks lichen leaves behind.
- Isolators. The switches that cut the power, and whether they’re in good shape.
- Cabling. Damage, wear and conduit that’s breaking down in the sun.
- Framing. The panel frames themselves.
- Mounting hardware. Rails, clamps and bolts, and any corrosion or loose fixings.
- Pest activity. Nests, droppings and anything chewing on the wiring.
- Inverter readings. What the inverter is showing, and anything that points to a fault.
You get before and after photos and a written report within 48 hours. If something ends up under warranty, that report is the paperwork you’ll need.
When eyes aren’t enough: drone thermal imaging
Some faults don’t look like anything from a ladder. Failed bypass diodes, microcracked cells and developing hot spots all show up as heat rather than anything visible. For bigger systems, especially commercial roofs and solar farms where walking every row isn’t practical, we fly a drone thermal inspection over the array and map every panel with an abnormal heat signature. Nobody walks on the roof, and the report tells your installer exactly which panels need a look.
Common questions
Does every solar panel clean include an inspection?
Yes. The 7-point inspection, the photos and the written report are all part of the price of the clean.
What happens if you find lichen that’s already caused damage?
We photograph it, note it on your file and tell you honestly what we’re seeing, so next visit we can compare and tell you whether it’s getting worse.
What if you find a nest?
We can clear it on the same visit and quote you for bird mesh so it doesn’t happen again.
What if you find something the original installer got wrong?
We photograph it and explain what we’re seeing in plain terms. The fix or the warranty claim is between you and your installer, since they put it in.
Do you check the inverter as well as the panels?
Yes. Inverter readings are one of the seven points we check on every visit.
How much does a drone thermal inspection cost?
It’s quoted per job, based on the size of the system and access. The 7-point inspection comes with every clean.
Not sure what’s actually on your roof?
You won’t know until someone who knows what they’re looking at gets up there. Book a solar panel clean, inspection included, or get a free quote.